Document Overview
Instructions
To guide the dealer's claim specialists from each dealer to operate the system properly.
Terms
| Terms | Explanation |
|---|---|
| GDMC | Global Digital Marketing Center, i.e. the "system" referred to in this document. |
| IDMS | International Dealer Management System |
Warranty Application
Warranty application list page
Path: GDMC system – Dealer Warranty – Warranty Management – Warranty Application
1.Search for the appropriate warranty claim application form by condition: Claim number, Dealer Claim number, VIN, and Review Status

2.Revoke or delete Claim application
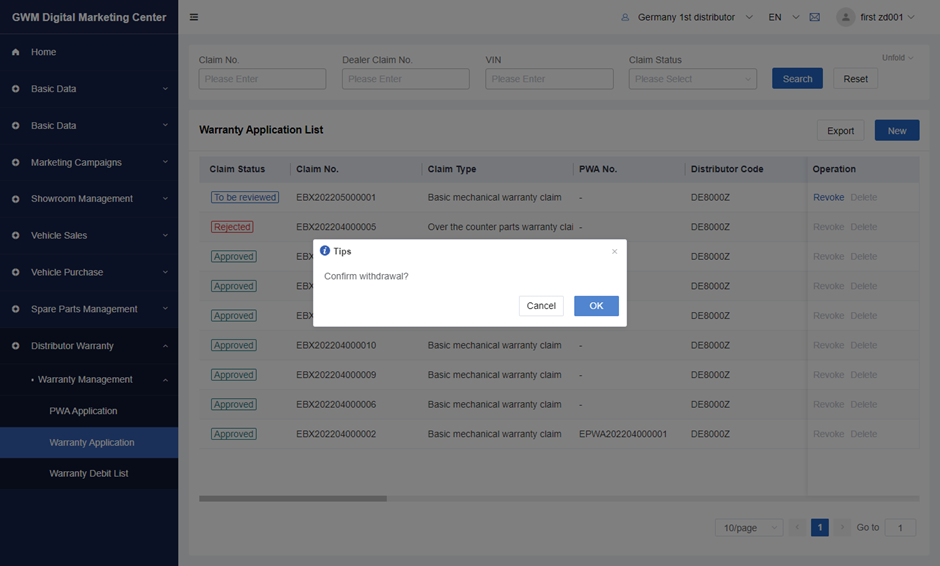
3 Create New claim application form
Note: For more detail about creating new warranty claim application, please check 4.1.2 Create New Warranty application page.
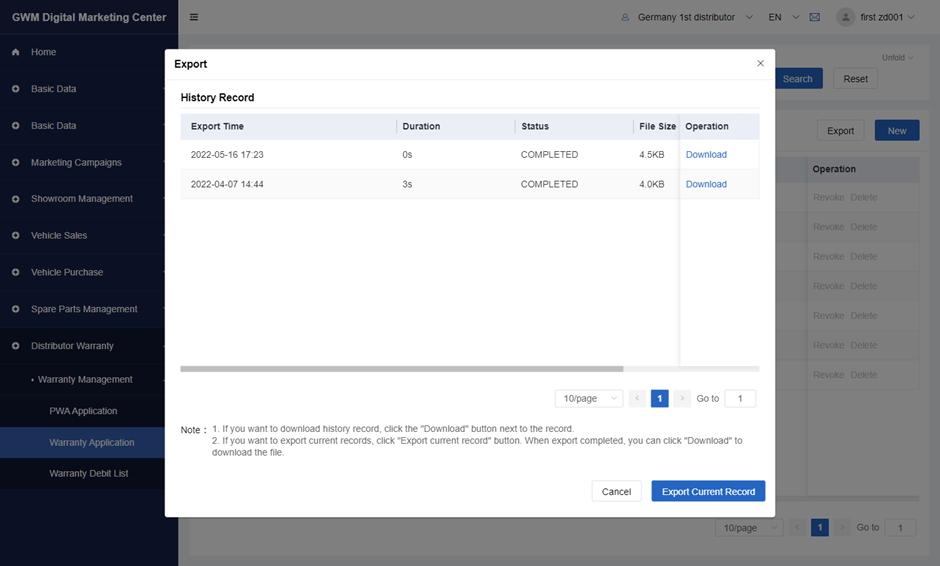
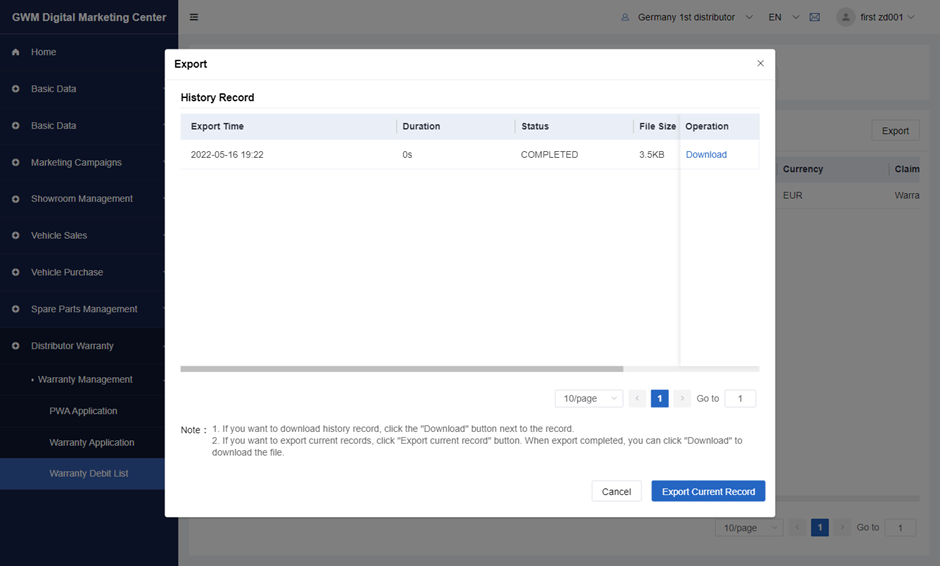
4.Exports the filtered Claim list. The exported format is excel, which displays the fields in the list and their information.
· Filter the claims that need to be export

· If you want to download history record, click the “Download” button
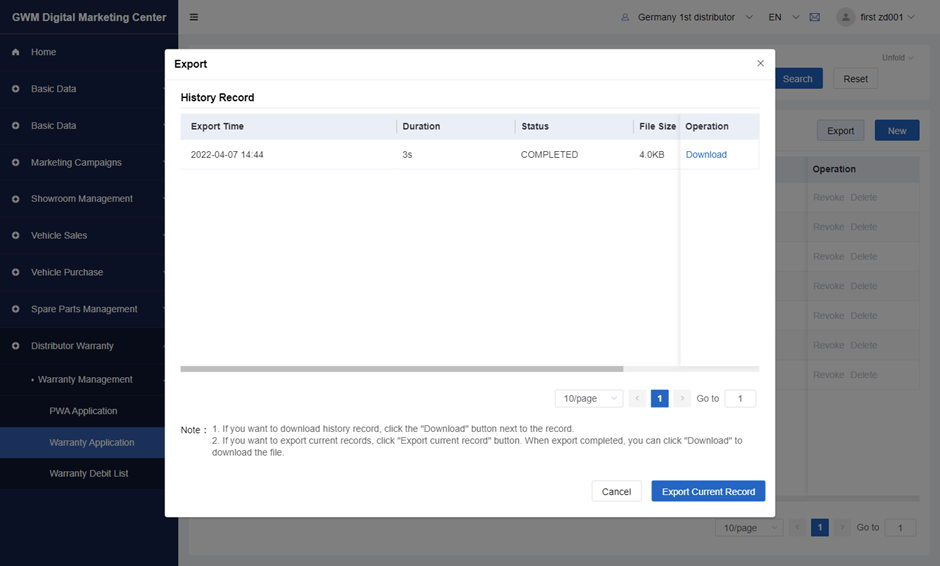
· If you want to export current records, click "Export current record" button. When export completed, you can click "Download" to download the file.
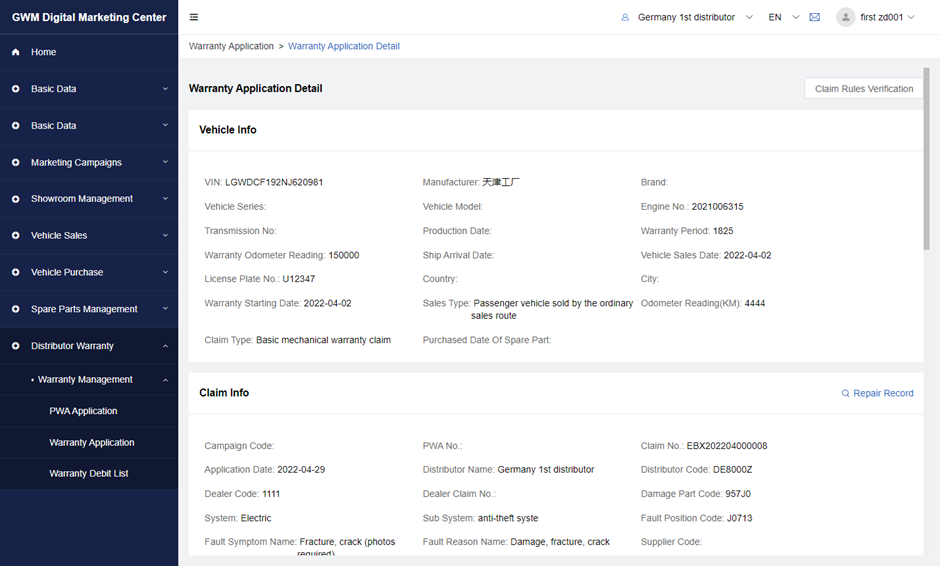
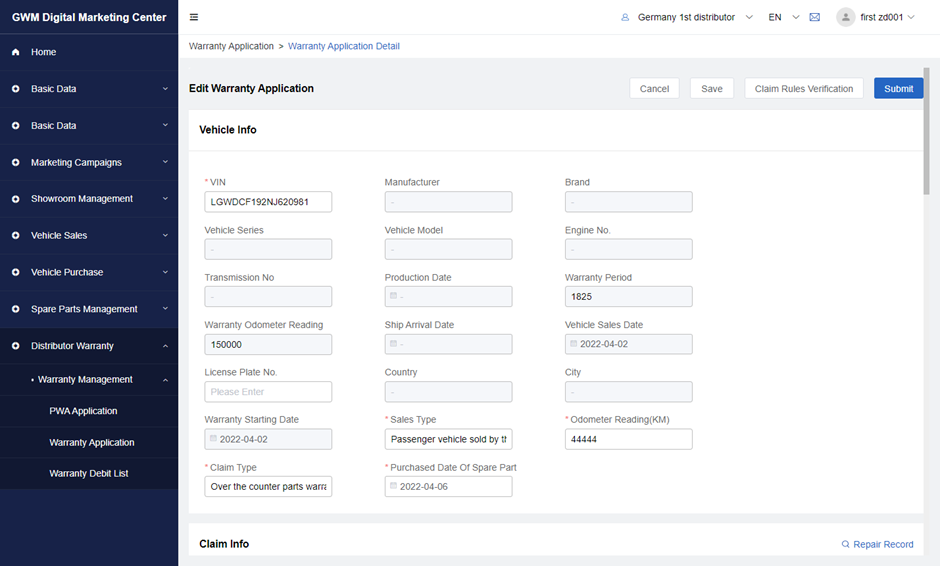
5 Click the warranty claim row that leads to the details page of this warranty application form
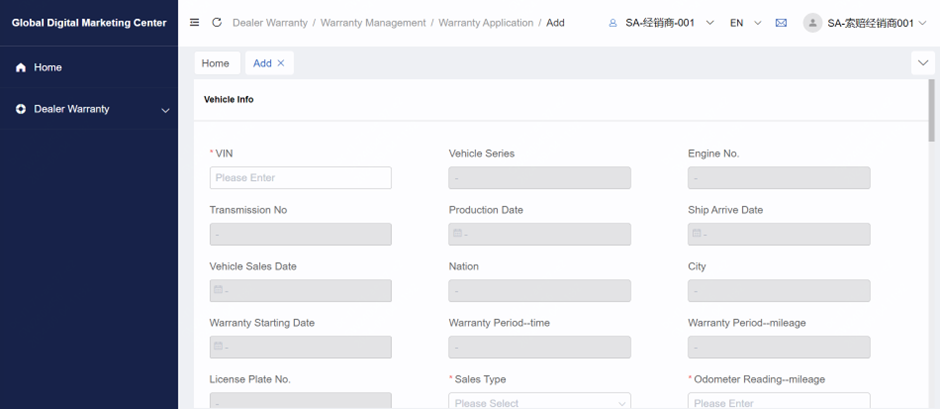
Create new warranty application page
After clicking “New” button in the warranty application list, users can access this page.
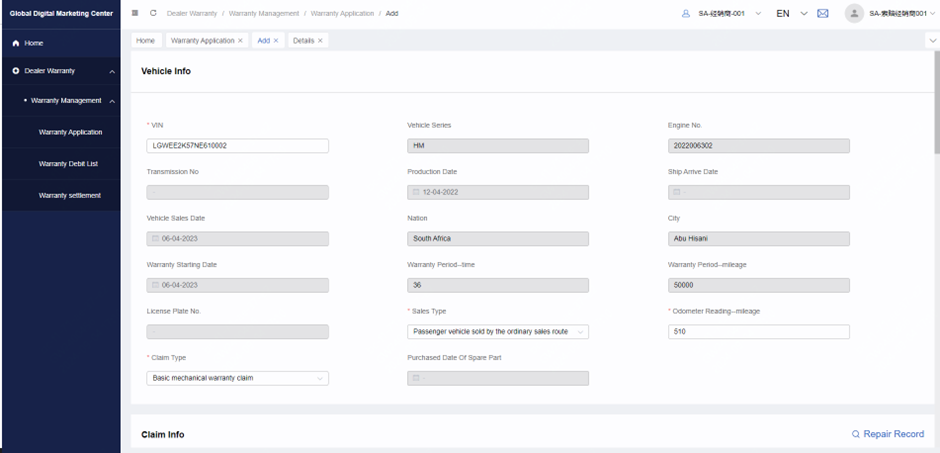
After entering VIN number, several fields will automatically show on the page, and cannot be edited. Users can enter Claim type, Sales type and Odometer reading in the rest of Vehicle info module.
In the Claim info, users need to enter Fault symptom name, Fault reason name, Fault description, Disposal result and Arrival date. After selecting Arrival Date in the Claim info module, users can add Labor info and Part info. If this claim type is Campaign, then users need to enter the Campaign code.
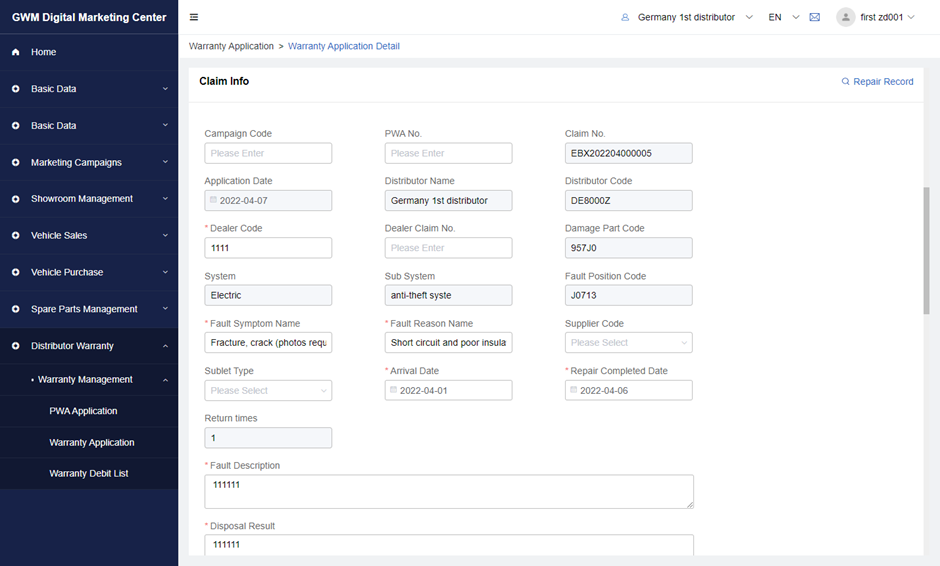
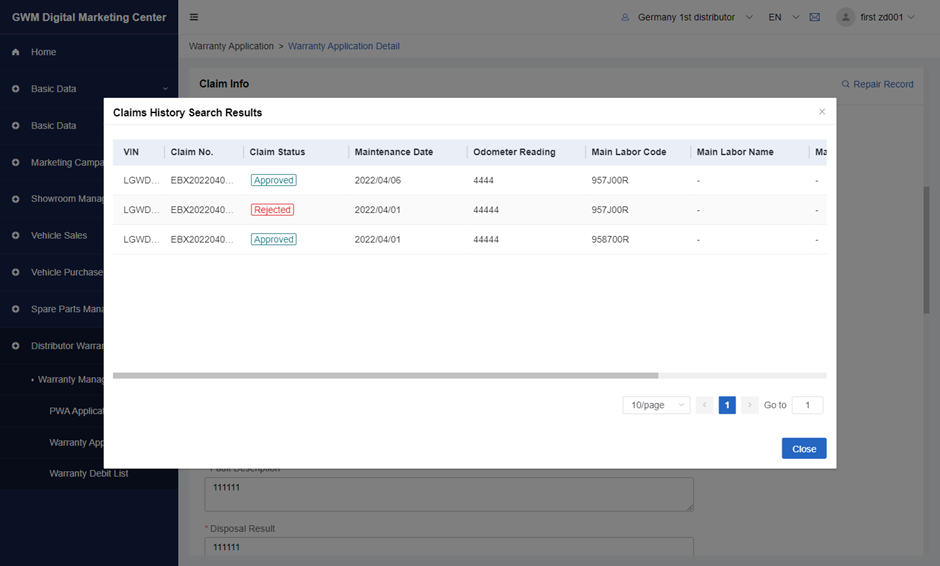
After clicking the Repair Record button, it will show the history of the claims under this VIN number.
Click the add button in the Labor info module, and users can select which labor code they want to use, and they can search the labor code and name by using the filter function. Users can multi-select the labor code as well.
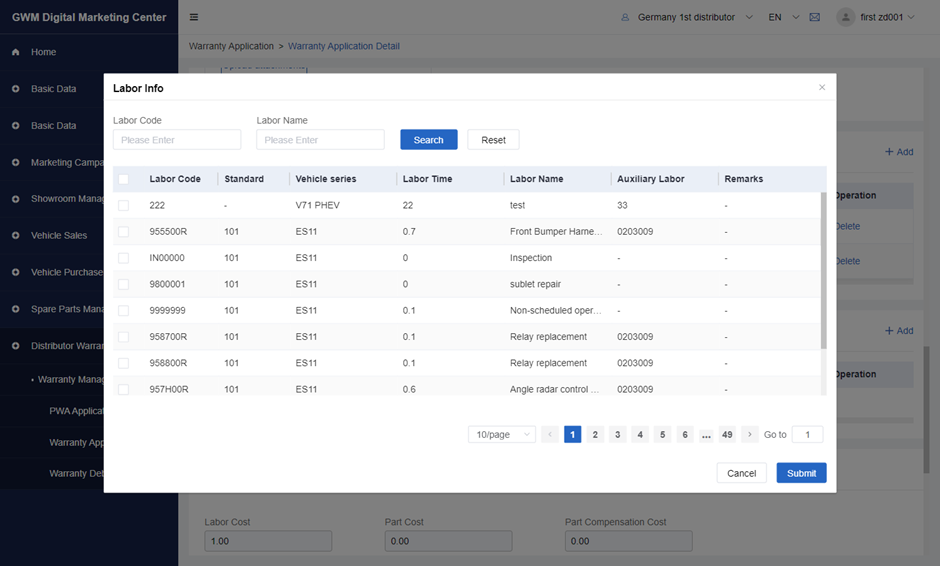
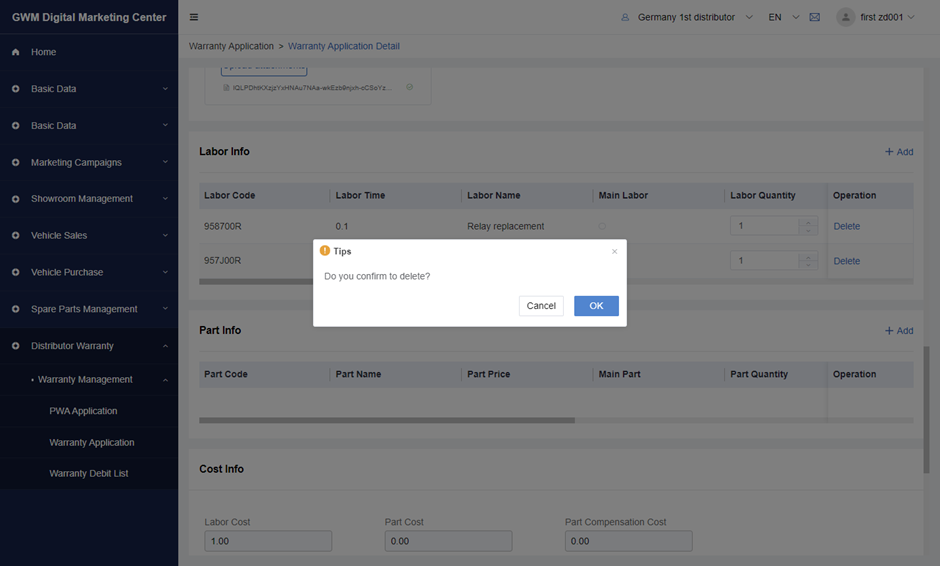
After selecting the labor, the labor will be showed on the Labor info module. User can select a main labor, enter labor quantity, and delete a labor info.
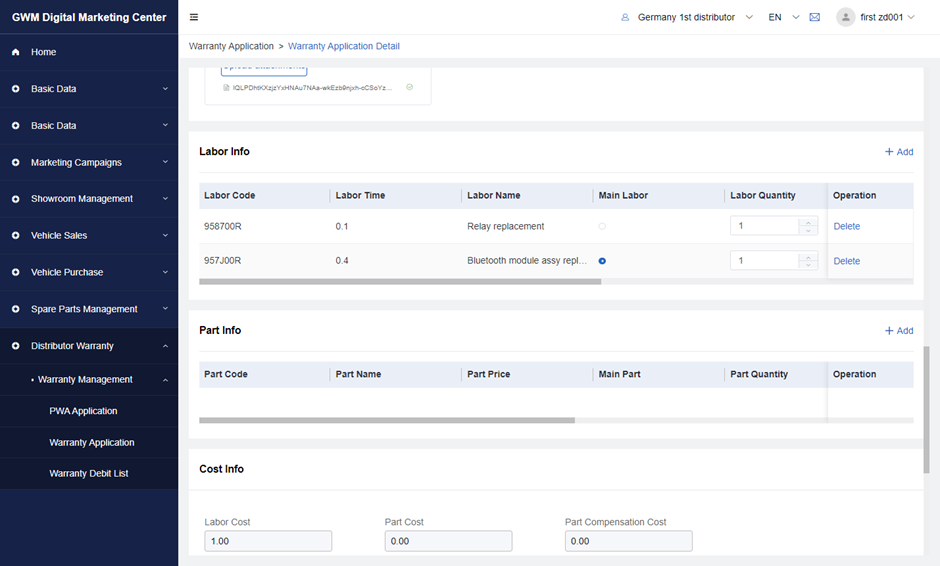
Click the add button in the Part info module, and users need to enter the part code and click the search button on the filter function. And then, User can add the selected parts into the Part info module.
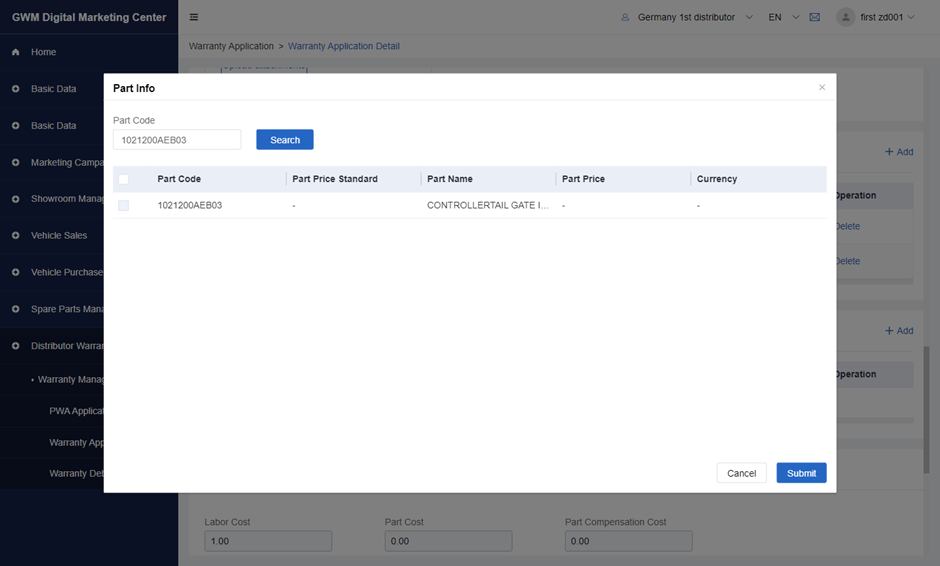
After selecting the parts, User can select a main part, enter part quantity, and delete a part info. The logic is same as the Labor info.
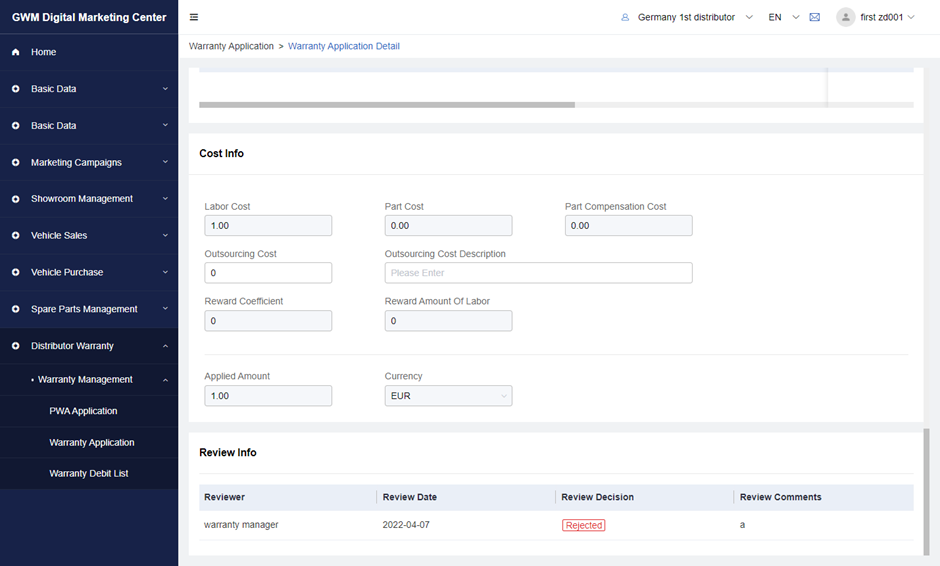
After entering the Labor info and Parts info, the Cost info will automatically calculate the total amount. Users can manually enter the outsourcing cost and description under this module. If the claim type is Campaign, it will have a reward coefficient and reward amount of labor additionally in the Cost info.
system checking rules
Before claim submission, system will do compliance of the claim arrcording to rules set in the system in advance.
The main rules are as follow:

| no | content | criterion | Warning message |
|---|---|---|---|
| 1 | Vehicle info | The vin in the claim should be in GDMC, if not can submit | can not find the vehicle in database! |
| 2 | Duplicated with existed claim | If dealer code+ vin+ repair start date +main labor is already existed in other claims then refuse to submit | The claim is already existed. |
| 3 | Submit Days of Claim | If claim submit date-repair end date > submit days of claim, refuse to submit. | The claim is not submitted within required days. |
| 4 | Time Limit for Resubmission of Returned Claim | If the claim is rejected, the resubmit date-rejected date>Time limit for resubmission of returned claim, refuse to submit | The claim is not submitted within required days. |
| 5 | mileage | If one of the following is true, refuse to submit 1) The repair start date >last time repair end date and the mileage < last time mileage 2) The repair start date < last time repair end date and mileage >last time mileage | the odometer reading is less than last claim! |
| 6 | Warranty period | warranty period rule 1) Besides pre-delivery and campaign type claim, all claims should have warranty start date. 2) Repair end date-warranty start date <=warranty days, if not refuse to submit 3) If claim type is campaign and the first two characters of the main labor are 88 or claim type is pre-delivery and warranty start date is empty, do not need to validate this rule. | the warranty of the vehicle has expired! |
| 7 | Warranty mileage | warranty mileage rule. 1) If the vehicle’s mileage exceeds warranty mileage refuse to submit 2) If claim type is campaign or pre-sale warranty skip the validation. | the warranty of the vehicle has expired! |
| 8 | Labor-material | Compare the main labor and main materal code with the craft route, if one of the following occurs, refuse to submit. 1) The vehicle series + main material code does not comply with craft route 2) The vehicle series + main labor code does not comply with craft route | Operation code/material data relationship inconsistent |
| 9 | Parts over counter | When the claim type is parts over counter, if the repair start date-part bought date > days in fault parts management, refuse to submit | the warranty of part has expired! |
| 10 | Warranty type | 1) If the warranty start date is empty but the claim type is not pre-delivery, refuse to submit 2)If the warranty start date is not empty but the claim type is pre-delivery ,refuse to submit | Warranty type error |
| 11 | TAR | If the claim amount exceeds 15000 rands ,there should have a TAR no. in the claim. the Tar no. can only be used once in claims. | Needs to fill in PWA no. |
| 12 | campaign | When the claim type is campaign, it should conform to the following rules. If the vin is not existed in the vehicle list of the campaign notification, refuse to sumbit If the repair start date is not within the limited time of the campaign, namely earlier than the campaign start date or later than the campaign end date, refuse to submit If the main labor、main material do not comply with the campaign refuse to submit. 4)If the campaign offers parts then the part cost on the claim should be 0,if not refuse to submit. 5)If the vin+ labor code is duplicated with existed claim refuse to submit | Active warranty requirements are not met |
Settlement
After the claim been approved it will go to settlement list. Dealers can their own settlement orders and do invoicing.
Settlement list
Click on warranty settlement menu and enter the settlement list, from here you can see the settlement orders generated by OEM.
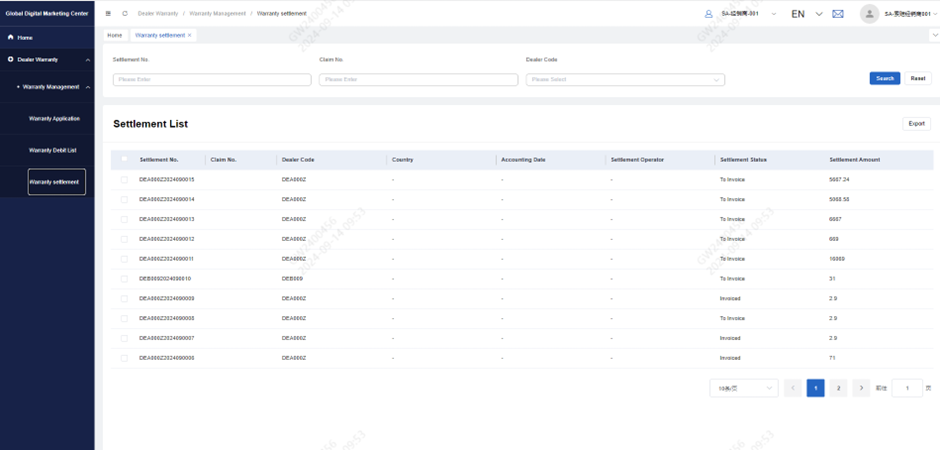
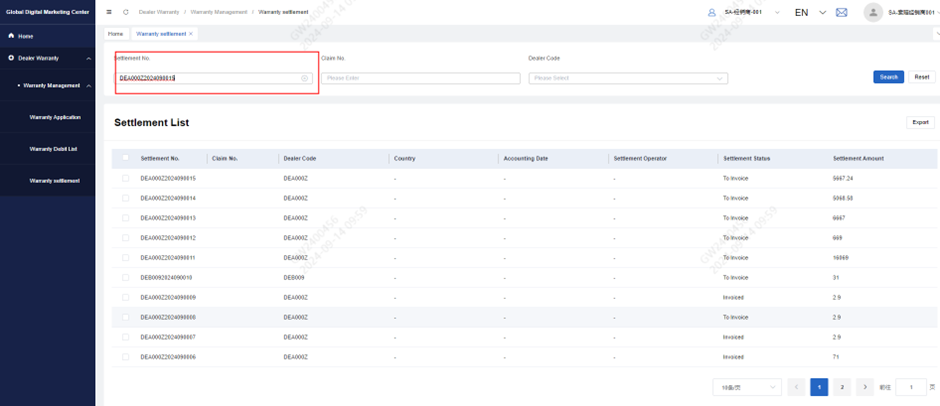
You can do filter by settlement no./claim no or settlement status.
Invoice
Those settlement orders with state To invoice means it waits for dealer to invoice.
Select one item that need to invoice and enter detailed information.
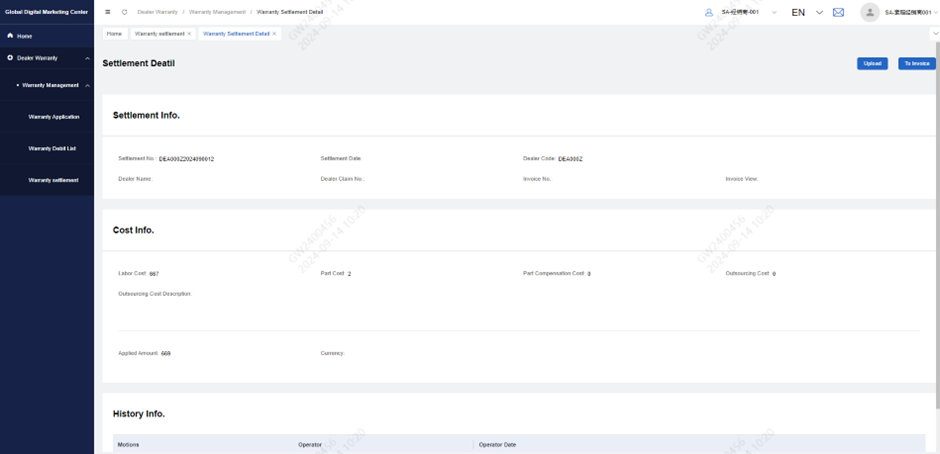
In this page user can see summary of the related claim and the amount settled. If there’s no problem, dealer need to invoice.
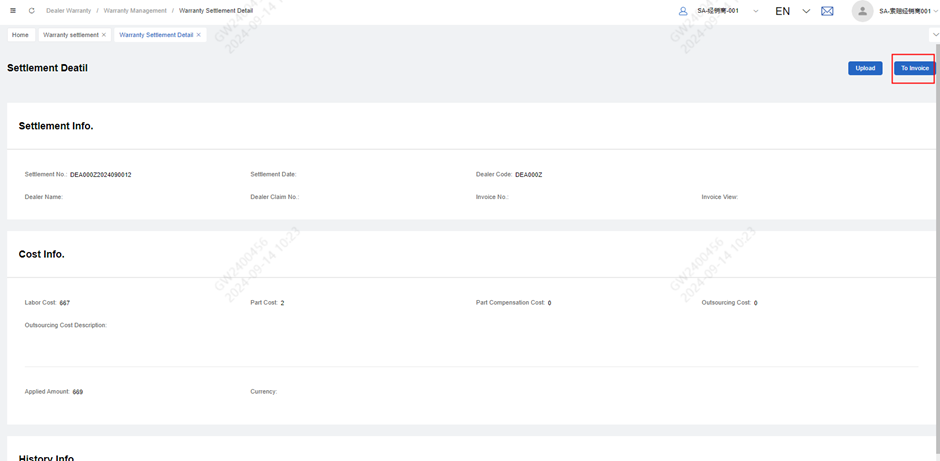
Click on to invoice button and the invoice will be generated automatically according to the template the OEM provided.

The user need to continue invoicing
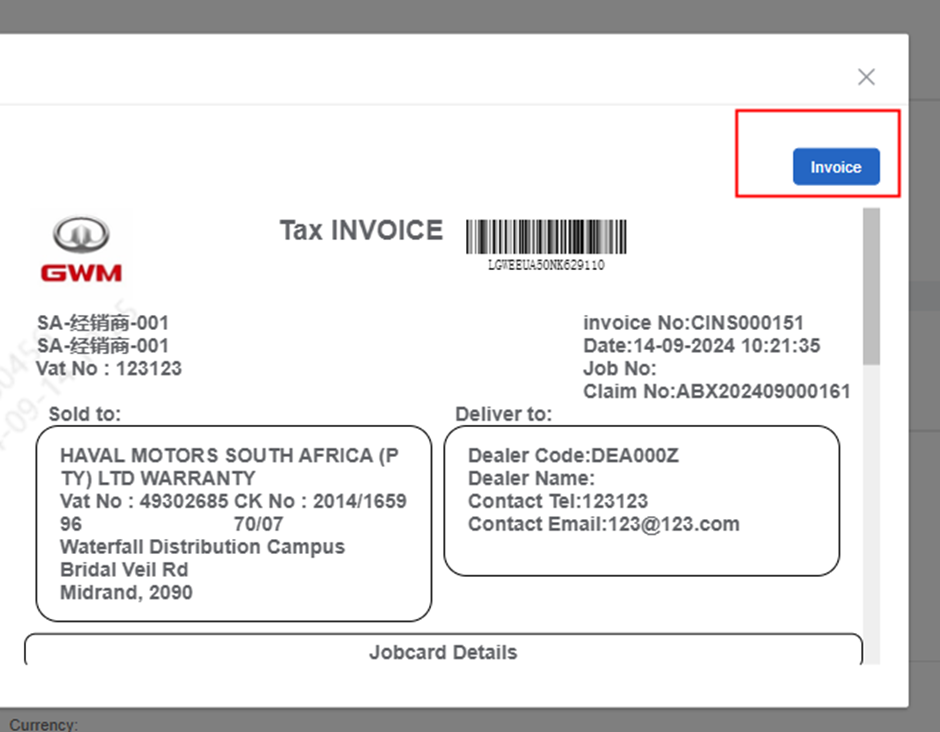
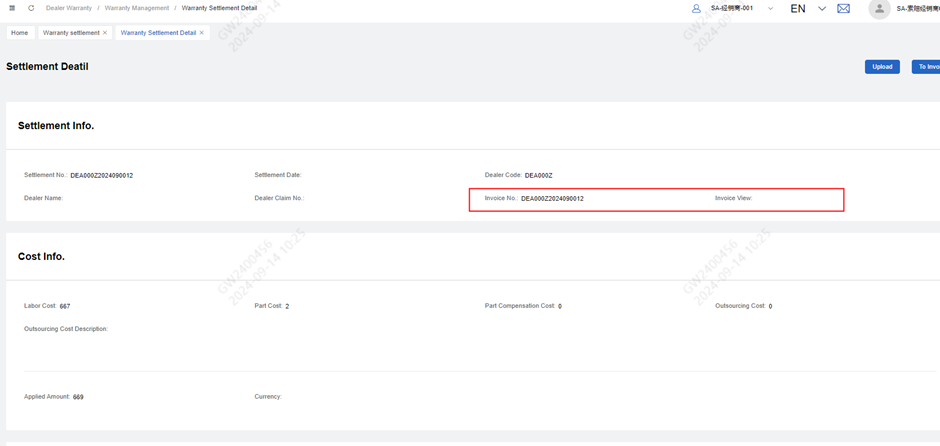
After invoicing, the invoice no. will be fill in the detailed information page
Then user if the OEM ask for a signature of the invoice, dealer should download the invoice and sign it, then upload it with other supporting files like repair orders.

Warranty debit operation manual
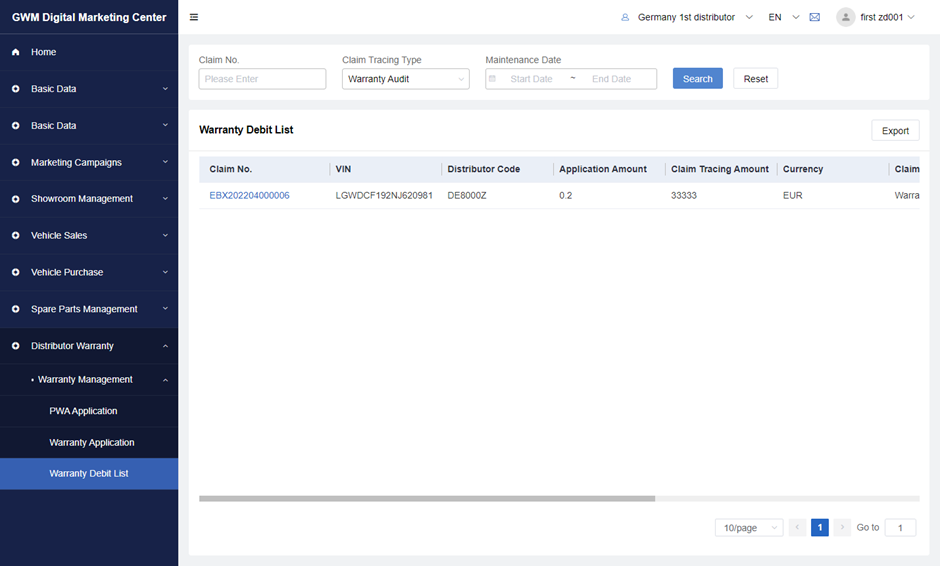
Warranty debit list (Distributor/channel side)
Path: GDMC system – Distributor Warranty - Warranty Management – Warranty Debit List
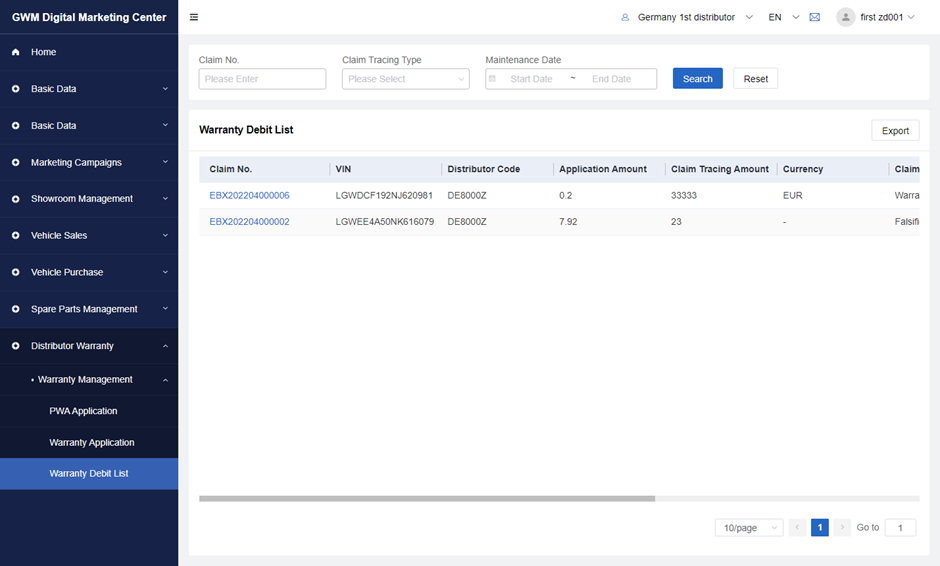
Search for the appropriate warranty debit form by condition: Claim Number and Claim tracing type, and Maintenance Date
The export function is as same as in the warranty claim list.
Note: Distributor side cannot edit or delete any warranty debit.